Introduction to Engineering Design
My First Bridge Project
|
The first project / assignment I created and submitted as part of my Semester I Exam grade in the portfolio section. This is a Google Documents file called "Step 8 Engineering Process." For this particular project, I had to write a one-page analysis and describe building specifications on a report for my first bridge I physically constructed. In this paper, I discuss how the first bridge tested horribly and then elaborated on how I could alter some essential design aspects for my second physical bridge below to improve both its efficiency and ability to withstand strong weights. This assignment was completed and submitted on January 6th, 2012.
|
Second Bridge Project - WPBD Picture
|
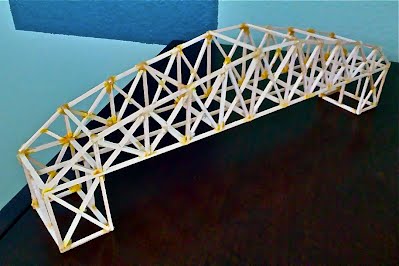
My second bridge project I designed in engineering is displayed to the left. This Pratt truss was completed and tested on January 17th, 2012, designed using a program called WPBD 2012, and physically constructed utilizing balsa wood and glue materials provided by my instructor and tested through a Structural Stress Analyzer that my teacher used to test the efficiency and ability to withstand weight of my class's bridges.
|
Third Bridge Project - WPBD Picture
|
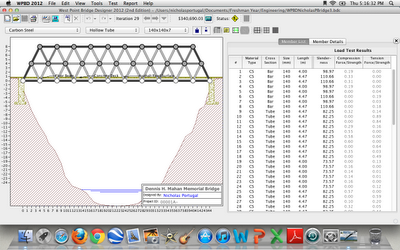
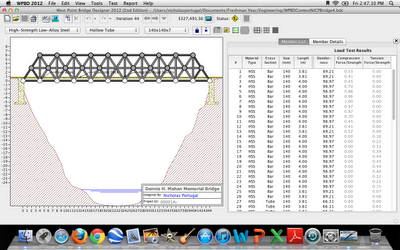
My third bridge project I designed to the left was created using a free engineering bridge construction program called West Point Bridge Designer 2012. I electronically submitted this through the West Point Bridge Designer Contest website. My program is participating in the WCTA WPBD Contest, so we utilize the contest website to submit all of our designs, and view our rankings. We can view rankings locally, as in how I placed in my class, and you can see how I ranked nationally with other students and schools from around the country who compete in the same contest as my class. It was submitted and ranked on January 27th, 2012.
|
Third Bridge Project Rankings
|
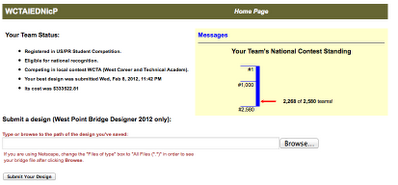
The third bridge above I designed is by far my most efficient bridge and was also most recently created and submitted to the West Point Bridge Designer Contest website. It was submitted and ranked on February 8th, 2012. The results for this particular bridge are the currently updated ones on the class bridge standings website. Click to view my class's standings: http://bridgecontest.usma.edu/standings/local/WCTA.htm To the right is a picture of my team's standings in the national competition for the West Point Bridge Designer Contest. My team is officially ranked at #2268 out of #2580!
|
Fourth Bridge Project - WPBD Picture
|
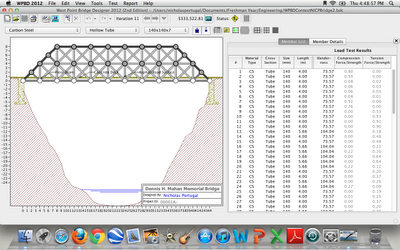
Next, I created a fourth bridge design on the West Point Bridge Designer software, and this one is by far my personal best, by far having the most efficiency and lowest cost to actually build. I achieved my personal best cost, which reduced from the 330,000's to the 320,000's in dollars, which is significantly ten thousand dollars lower, since engineers must always find ways to utilize the least money when designing their massive projects. To the left is my bridge's screenshot. My National Bridge Ranking: 3134th place out of 3535 teams!
|
Mousetrap Car Project - Autodesk Inventor Professional
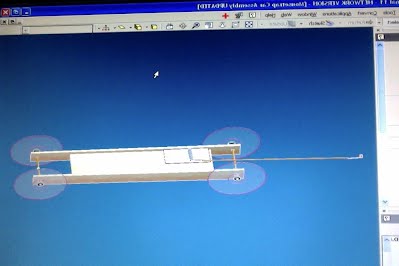
One great project relating to the study of Engineering In Motion was the Mousetrap Powered Car. This car is powered by a mousetrap's lever arm release, and involves both potential and kinetic energy to allow the wheels to rotate and speed down a straight path. Unfortunately, the car didn't travel in an exactly straight path, it did indeed swerve slightly to the right as it was released, but it travels pretty far at a fast speed. To the left is a snapshot of my mousetrap powered car taken in an engineering program called Autodesk Inventor Professional 2011. We use this excellent program to not only create great projects and animate objects, but we also use it to animate and make showcased presentations of our projects that are professionally designed to present to other teachers, or even engineers in the future!
Solar Racing Car - Physical Model
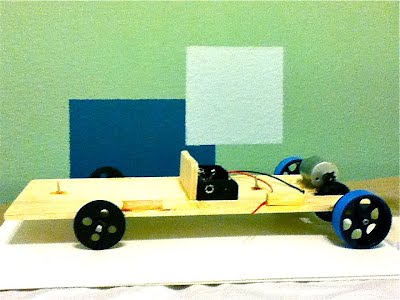
The last project I constructed in Engineering for my freshman year was my Solar Racer. There are several features of this car that make it unique, such as the way it is powered to move. This car is powered using solar power, by attaching a solar panel to the top of it, then connecting both the red and black wires to the gray motor. The gray motor holds the energy to activate the solar panel, thus generating energy from the sun for the gear ratio, which is the black cog adjacent to the motor, and allows it to spin. When the gear ratio is able to spin, it spins on the axle, which holds the wheels together, and spins the wheels so that they move. The blue rubber bands on the large back wheels are for braking purposes so that the car will come to a stop when necessary, as the front wheels are secured and move only when the back ones do, thus being a rear-wheel drive car. If you are inside and/or there's no sunlight available to use, then there's a black battery holder in the middle of the car so you can place two double A batteries to alternatively test your car. It's the same process to connect this battery holder just like the solar panel, by attaching the red and black wires to the motor, and it does the rest.
Alternative Energy PowerPoint Presentation
To conclude my freshman year of engineering, and to serve as a helpful study guide for the final exam, I created an alternative energy presentation, which describes what is energy, how it is used, why we use so much of it, and how we can replace old energy sources with completely renewable ones. Alternative energy helps us to create less pollution and emissions, as well as have a reliable energy source in case our normal non-renewable sources ever run out someday.
Step 8 of the Engineering Process
Steps of the Engineering Process (10):
1) Identify the Problem
2) Define Working Criteria and Goals
3) Research and Gather Data
4) Brainstorm and Generate Creative Ideas
5) Analyze Potential Solutions
6) Develop & Test Models
7) Make The Decision
8) Communicate & Specify
9) Implement & Commercialize
10) Post-Implementation Review & Assessment
